
By Admin
The Kegel, the black box of the exercise world.
Are you really doing it right?
In today’s post we are going to review some simple exercises to help get to know the pelvic floor muscles. Now, I strongly recommend going through my past post “Exercises for Short/Tight Pelvic Floor” first. Generally speaking, patients with pelvic pain should not kegel as a therapeutic exercise. Kegel exercises may be better suited for postpartum women or those with prolapse or stress urinary incontinence, but not always. Of course, a pelvic floor physical and occupational therapists is the best judge of where you fall on the spectrum of pelvic floor muscle function and if you need to lengthen or strengthen your muscles. With that said, this post is to teach people, who should kegel, how to kegel.
Okay, that said I will proceed. Remember, if you have any discomfort or negative change in function, stop the exercises and go find your nearest friendly- neighborhood pelvic floor PT.
So, Dr. Kegel had a reasonable idea. Let’s have people, women mostly, start strengthening the muscles of their pelvis so they don’t have to have surgery and can do self rehab. Now, barring the fact that many people, women and men, don’t need to do Kegels, there was one other fault to this idea. Pelvic floor muscles are intricately connected to the rest of the body, meaning a kegel by itself can’t do very much. Its isolation limits its power. Using other muscles can help facilitate a full pelvic floor contraction and core recruitment. Ideally, this should occur automatically, but we’ll talk about that another day. So, we’ll start with some basic individual muscle contractions of the pelvic floor then move to more integrated exercises. To understand this a bit more take a look at what Diane Lee says about the “core”.
Week 1: Synchronizing Superficial Sphincters!
So let’s start with the first level of the pelvic floor, the most superficial (most close to the surface). This is the sphincter work. You can try 1-2 sets of these a day for a week just to get the sensation of recruiting these superficial muscles.
Start sitting in a neutral position, equally weighted on your sits bones right to left and back to front. It can be very helpful to do this on a yoga ball.
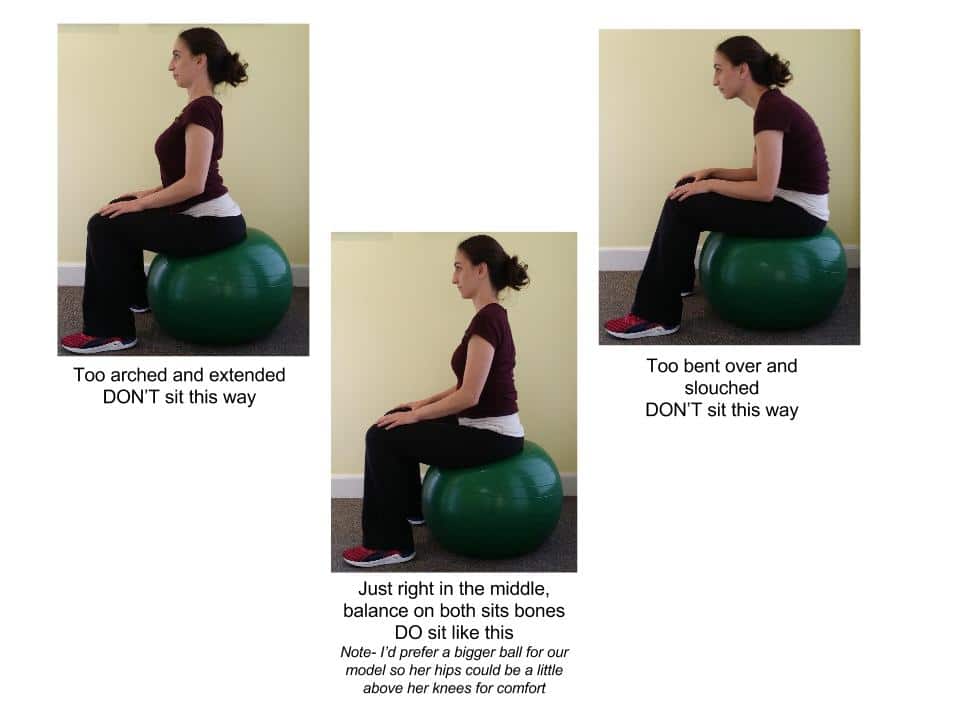
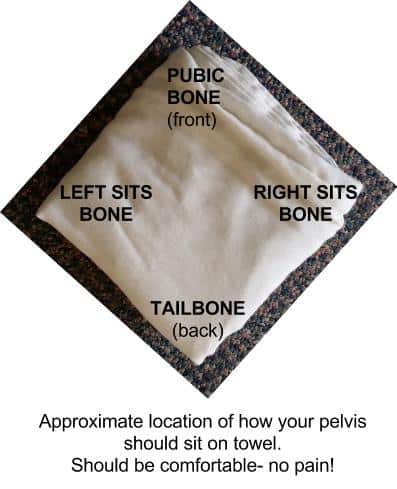
Or, if you don’t have a yoga ball you could sit upright on a firm chair on a folded hand towel. If using a hand towel, it is helpful to orient it with each corner matching the pubic bone, tailbone and two sits bones,so the square towel is rotated to make a diamond. This just gives better feedback to the muscles since they attach from the pubic bone, coccyx and sits bone.
Take a couple moments to relax and breathe easy, relax your breath and diaphragm, let your belly drop. Once you feel comfortable you can try some of these cues to activate your superficial muscles of your pelvic floor.
Exercise 1: Wink
There is a small thin sphincter around your anus. It has quick movement.
Very lightly try to wink your anus. Then relax. Wink your anus. Relax.
Try this a couple times, then breathe and let go all the way.
Exercise 2: Nod
There are some muscles that attach right below your pubic bone, to the fascia around your urethra and clitoris/penis. Try to nod the clitoris/penis. Relax. Nod. Relax. Nod. Relax.
You can also try the cue lift or flick the clitoris/penis (just don’t actually flick it with your finger ;).
Try this a couple times and relax and breathe.
Exercise 3: Draw
Now we are going to think a bit more globally.
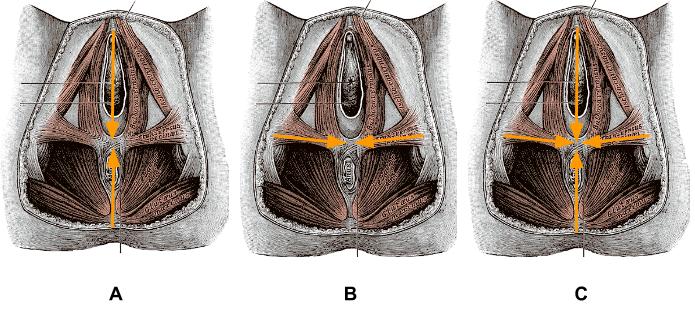
A. Try to draw your pubic bone to your tailbone, or draw front to back and back to front, lightly. Relax. This should not engage your belly, hips or thighs, it should be very light.
B. Now try to draw sit bone to sit bone to meet in the middle, lightly. Relax. This should not engage your belly, hips or thighs, it should be very light.
C. Now try both at once, draw the Four Corners* together to meet in the middle, front and back draw towards the center, right and left draw to the center, lightly. Relax. Same as above, keep it light.
*remember Four Corners exercise for later
Note: There is a tendency to overdo this one, so keep it easy. It should feel like a hint of a movement. As with all the above exercises, your glutes, belly, jaw, shoulders are relaxed.
After you do all these exercises, go into a child’s pose or happy baby posture to help your pelvic floor let go and stretch. After you exercise a muscle it is helpful to stretch it to keep it mobile.
Happy Baby

Child’s Pose

Week 2: Diving into the Deep End
So after a week or so of Synchronized Sphincter work, if you have no increased symptoms and no pain, you can now dive into the deep end. In Week 1 the focus is on layer 1 of the pelvic floor, which tends to be flat muscles, primarily in charge of closing, hence “sphincteric”. Now, in week 2, we’ll focus on the deeper pelvic floor muscles. These muscles are in charge of supporting the pelvic organs and are considered part of our “core”.
If you’re a visual learner take a look at the pictures below. If they just confuse you, skip it.
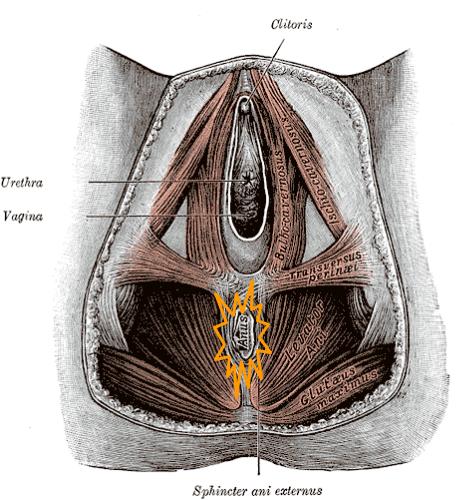
From Below
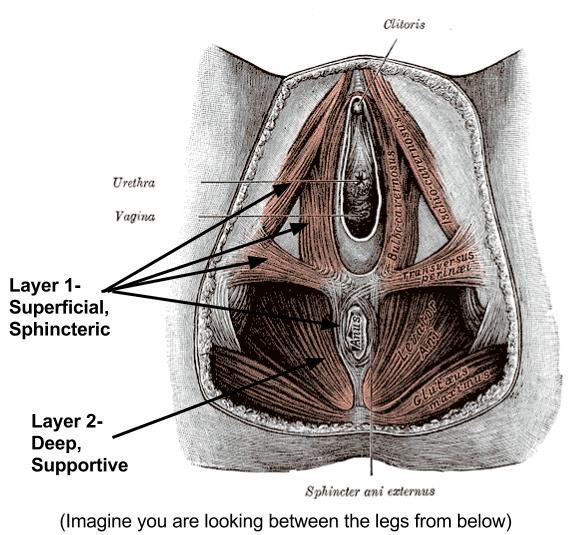
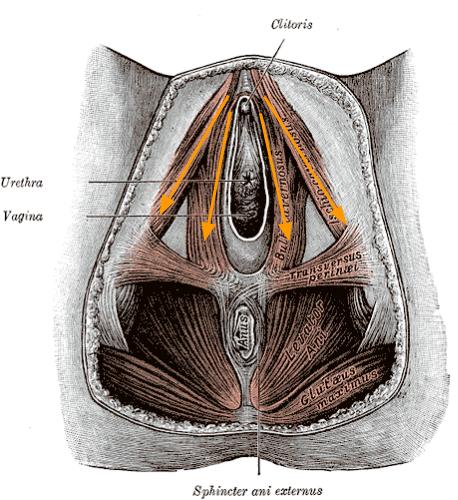
From the Side

Okay, now that you are thoroughly confused let’s just get down to business: how to facilitate the deep pelvic floor muscles.
Pick up the Hankie
In this exercise we transition from superficial to deep muscles. So start sitting on a yoga ball, or on a firm surface with a folded hand towel, like before.
1. Inhale feel the relaxation and drop of pelvic floor muscles into the surface (ball, towel).

2. Exhale, draw the Four Corners to the center.

3. Inhale, relax, feel the drop/bulge of the pelvic floor.

4. Exhale, draw the Four Corners to the center, imagining you are drawing the corners of a hankie together…. then, once the four corners are gathered, slowly lift the hankie deep into the pelvis.
(If you are sitting on the towel you can imagine you are drawing the corners of the towel together then lifting it up in the center)

5. Inhale, relax, everything.
6. You can repeat this ~ 5 times. If you’re doing this correctly you should feel your low abdomen tighten on it’s own and you should be able to breathe normally.
Variations:
A. Maintain the contraction for 2 easy breaths, then relax. Make sure you keep breathing the whole time- don’t hold your breath, that’s cheating 😉
B. Instead of “picking up the hankie” straight up, try picking it up on a diagonal. If you look at the orientation of the pelvic floor muscles they are actually like a sling, coming off the pubic bone, wrapping around the anus and back up to the pubic bone. This may be helpful in actually feeling the work. So, draw the anus towards the pubic bone.

C. If you feel like you just keep squeezing your butt you probably are. You can tell when you relax your muscles, your butt or hips relax too, meaning these extra muscles were working as well. If this is happening, then try laying down on your back and bring your legs up to your chest and hold them there with your arms, kinda like happy baby. This position inhibits you hips from working and relaxes your pelvic floor. That way you can sense when you are using your pelvic floor muscles versus your butt.
Move and Grove
Once you tap into your pelvic floor muscles you can try adding this contraction to everyday activities or exercise routines. What you should find is you have more stability and power, it will take you less effort lift, swim, walk, hike, ski, etc. Below are just a couple ideas to connect the pelvic floor with bigger movements.
1. Arm pulls/flutter arms

Using light resistance, stand comfortably with slightly soft knees (you can do this seated or on your back knees bent in neutral spine). Inhale to prepare, exhale draw your pelvic floor muscles deep and slightly up towards the pubic bone (same contraction as we’ve been doing). Now to feel the connection you can pull your arms straight down in front of you, or in a slight “V”. Inhale, keep the arms down, Exhale slowly bring the arms up and rest. Repeat as you’d like.
2. Hover Planks

On your hands and knees position, keep your spine in neutral. Inhale, exhale and draw your pelvic floor muscles in, and your navel to spine. Then hover your knees just above the ground. Take 5-10 breaths maintaining the alignment, slowly lower, and relax. Repeat as you’d like.
3. The sky’s the limit, just see if you can incorporate in your favorite exercises.
I hope you enjoyed this cursory introduction to your pelvic floor muscles. Hopefully this shed a bit more light on that black box. Remember, the strength of a kegel is not measured by the squeeze, but how it supports the rest of our movement and function.
FAQ
What are pelvic floor muscles?
The pelvic floor muscles are a group of muscles that run from the coccyx to the pubic bone. They are part of the core, helping to support our entire body as well as providing support for the bowel, bladder and uterus. These muscles help us maintain bowel and bladder control and are involved in sexual pleasure and orgasm. The technical name of the pelvic floor muscles is the Levator Ani muscle group. The pudendal nerve, the levator ani nerve, and branches from the S2 – S4 nerve roots innervate the pelvic floor muscles. They are under voluntary and autonomic control, which is a unique feature only they possess compared to other muscle groups.
What is pelvic floor physical and occupational therapy?
Pelvic floor physical and occupational therapy is a specialized area of physical and occupational therapy. Currently, physical and occupational therapistss need advanced post-graduate education to be able to help people with pelvic floor dysfunction because pelvic floor disorders are not yet being taught in standard physical and occupational therapy curricula. The Pelvic Health and Rehabilitation Center provides extensive training for our staff because we recognize the limitations of physical and occupational therapy education in this unique area.
What happens at pelvic floor therapy?
During an evaluation for pelvic floor dysfunction the physical and occupational therapists will take a detailed history. Following the history the physical and occupational therapists will leave the room to allow the patient to change and drape themselves. The physical and occupational therapists will return to the room and using gloved hands will perform an external and internal manual assessment of the pelvic floor and girdle muscles. The physical and occupational therapists will once again leave the room and allow the patient to dress. Following the manual examination there may also be an examination of strength, motor control, and overall biomechanics and neuromuscular control. The physical and occupational therapists will then communicate the findings to the patient and together with their patient they establish an assessment, short term and long term goals and a treatment plan. Typically people with pelvic floor dysfunction are seen one time per week for one hour for varying amounts of time based on the severity and chronicity of the disease. A home exercise program will be established and the physical and occupational therapists will help coordinate other providers on the treatment team. Typically patients are seen for 3 months to a year.
What is pudendal neuralgia and how is it treated?
Pudendal Neuralgia is a clinical diagnosis that means pain in the sensory distribution of the pudendal nerve. The pudendal nerve is a mixed nerve that exits the S2 – S4 sacral nerve roots, we have a right and left pudendal nerve and each side has three main trunks: the dorsal branch, the perineal branch, and the inferior rectal branch. The branches supply sensation to the clitoris/penis, labia/scrotum, perineum, anus, the distal ⅓ of the urethra and rectum, and the vulva and vestibule. The nerve branches also control the pelvic floor muscles. The pudendal nerve follows a tortuous path through the pelvic floor and girdle, leaving it vulnerable to compression and tension injuries at various points along its path.
Pudendal Neuralgia occurs when the nerve is unable to slide, glide and move normally and as a result, people experience pain in some or all of the above-mentioned areas. Pelvic floor physical and occupational therapy plays a crucial role in identifying the mechanical impairments that are affecting the nerve. The physical and occupational therapy treatment plan is designed to restore normal neural function. Patients with pudendal neuralgia require pelvic floor physical and occupational therapy and may also benefit from medical management that includes pharmaceuticals and procedures such as pudendal nerve blocks or botox injections.
What is interstitial cystitis and how is it treated?
Interstitial Cystitis is a clinical diagnosis characterized by irritative bladder symptoms such as urinary urgency, frequency, and hesitancy in the absence of infection. Research has shown the majority of patients who meet the clinical definition have pelvic floor dysfunction and myalgia. Therefore, the American Urologic Association recommends pelvic floor physical and occupational therapy as first-line treatment for Interstitial Cystitis. Patients will benefit from pelvic floor physical and occupational therapy and may also benefit from pharmacologic management or medical procedures such as bladder instillations.
Who is the Pelvic Health and Rehabilitation Team?
The Pelvic Health and Rehabilitation Center was founded by Elizabeth Akincilar and Stephanie Prendergast in 2006, they have been treating people with pelvic floor disorders since 2001. They were trained and mentored by a medical doctor and quickly became experts in treating pelvic floor disorders. They began creating courses and sharing their knowledge around the world. They expanded to 11 locations in the United States and developed a residency style training program for their employees with ongoing weekly mentoring. The physical and occupational therapistss who work at PHRC have undergone more training than the majority of pelvic floor physical and occupational therapistss and as a result offer efficient and high quality care.
How many years of experience do we have?
Stephanie and Liz have 24 years of experience and help each and every team member become an expert in the field through their training and mentoring program.
Why PHRC versus anyone else?
PHRC is unique because of the specific focus on pelvic floor disorders and the leadership at our company. We are constantly lecturing, teaching, and staying ahead of the curve with our connections to medical experts and emerging experts. As a result, we are able to efficiently and effectively help our patients restore their pelvic health.
Do we treat men for pelvic floor therapy?
The Pelvic Health and Rehabilitation Center is unique in that the Cofounders have always treated people of all genders and therefore have trained the team members and staff the same way. Many pelvic floor physical and occupational therapistss focus solely on people with vulvas, this is not the case here.
Do I need pelvic floor therapy forever?
The majority of people with pelvic floor dysfunction will undergo pelvic floor physical and occupational therapy for a set amount of time based on their goals. Every 6 -8 weeks goals will be re-established based on the physical improvements and remaining physical impairments. Most patients will achieve their goals in 3 – 6 months. If there are complicating medical or untreated comorbidities some patients will be in therapy longer.
Comments
My physical therapist said no Kegals for pudendal nerve entrapment
Author Britt Van Hees says:
Hi Joan,
Yes, your physical therapist is correct. I would not recommend doing kegels if you have pudendal neuralgia. Your PT may be concerned regarding your pelvic floor muscles being too tight. If this is the case, it may be helpful to look at the the Exercise for Short/Tight Pelvic Floor Muscles (https://pelvicpainrehab.com/pelvic-pain/3676/exercises-short-tight-pelvic-floor-muscles/) together and see if any of those are appropriate. Great question and great job listening to your PT!
This was great. I went to a pelvic floor phisio and it this was a great reminder.