
“Share the load” – Samwise Gamgee
“It’s all about the base ” – Meghan Trainor
“Drop it like it’s hot” – Snoop Dogg
Some different quotes from last time, but after reading today’s post you’ll understand how Samwise, Ms. Trainor and Dr. Dogg are all talking about posture and the pelvis, and they didn’t even know it.
How did the last post go? Often I hear from patients and practitioners, “That’s great, but how do we apply this, how can I fix my posture?” Well it’s a big question, so let’s get started with the basics. Say hello to your core.

Yes, your core is a can of soda, or Kombucha, if you live in the hippy Berkeley like me. For those of us who need a little more explanation I’ve drawn in some extra illustration: theory compliments of the ingenious Mary Massery, PT, DPT, DSc, Fanta diagram thanks to yours truly. The theory goes, when pressurized, the can is strong and can hold some weight, on its top, bottom, on the side, wherever. I mean, have you ever tried to crush a full, unopened soda can? It’s kind of hard. But, pop the top, drink up the goods, take away the internal pressure, and you end up with a problem…

Or perhaps this is more accurate….

Yup, that’s how incontinence happens. Boom, mind blown…mine that is. When the pressure on the outside exceeds the pressure on the inside, stuff comes out, it’s simple physics. But really, people are not cans, they are bodies. So how does this pressure thing apply to human beings that have more moving parts than a pop-lid and more on the inside than just sugar water? Let’s do one more diagram, it’s one you’ve already seen, so don’t freak out too much.

Do you remember these folks? Good ol’ Juan… and Sara and Bruno who couldn’t catch a break. Remember what we said about IAP (intra-abdominal pressure). Juan can produce the greatest IAP because of his alignment of his thoracic and pelvic diaphragm. When IAP increases, so does trunk stability and strength, it’s how our bodies were designed to work, just like a soda can. Does that mean that sometimes it’s not just about strength, but also about the balance of pressure and alignment? Yup. I’ll take it one more step- you can’t be strong if you aren’t in good alignment. Shut yo’ mouth! This is one reason why “kegeling” or only strengthening the pelvic floor may not solve the problem of incontinence….prolapse…constipation…pelvic pain…low back pain….SIJ dysfunction….fill in the blank…it’s a whole body problem. Juan is stable, not because he does sit-ups, but because his alignment is setup to use and facilitate his core in daily life. So let’s break it down. If we think about blocks, all the blocks of his body are (relatively) stacked- remember these google images aren’t perfect- but he’s pretty good. His pelvis is stacked over the base of his feet, his abdomen is stacked on the base of his pelvis, his rib cage is stacked on the base of his abdomen and so on and so on. This stacking allows for better force generation and force attenuation, and does that cool pressure-soda-can thing. So now let’s help you find your optimal posture. (Note: like the pelvic floor, I am not an island, much of the following information is from Vicky Saliba Johnson, PT, FFFMT, FAAOMPT, a pioneer in the field of posture and all things core)
The How-Tos of Finding Your Optimal Posture:
A strong recommendation- progress slowly. It can be very frustrating so give yourself time and grace. I recommend trying each positioning exercise on its own for a week. That way you feel successful and can recognize changes in your body. I’ve written two sets of instructions- 10 Quick and Dirty just below and 12 Crazy Specific at the bottom of the page, depending how much of a posture nerd you are. I’ve also included a video for you visual learners out there.
Watch the video- disclaimer, I’m a regular person so my posture may be a little imperfect, kind of like Sara’s. My low back is a little tight and my neck basically defines the term “forward head”- but I can still find a more optimal positioning with what I’ve got to work with. So don’t judge me too hard, this is for learning 😉
10 Quick and Dirty Instructions:
- Stand sideways in the mirror- take a gander at your current posture.
- Feel the weight in your feet and center it between the ball of your foot and your heel, no grippy toes.
- Take a big breath in and lift your ribcage up to offload your pelvis. Relax, put your hands on your pelvis and rock forward (tail drop) and backward (back arch).
- Start stacking- lift rib cage and bring your rib cage on top of your pelvis, you may need to bring the ribcage forward (like me) or bring the pelvis forward depending which is behind, and what best keeps you stacked on your feet.
- Relax your tailbone down to the ground to lengthen your lower back (can be helpful to soften your knees a bit here)- DON’T let your ribcage fall back, keep it lifted and forward.
- Keep ribcage lifted, relax organs/belly into pelvic bowl (towards the back of the pelvis/coccyx to help with the tailbone drop). This can be really hard, LET GO of your organs/belly- just for this exercise.
- Set the rib cage on top of the abdomen (the inclination is for it to fall back so set it forward a bit).
- Check the mirror- pelvis should be over feet, abdomen should be RELAXED in pelvis, and rib cage should be relaxed resting over everything below. Everything will feel WEIRD, but you should feel grounded and relaxed from your feet to your rib cage.
- Shoulders- bring your shoulder up, rotate them open while they are up, keep them rotated open and hug them down onto your back.
- Lengthen the back of your head long, allowing your chin to softly nod.
Done, now don’t move! Haha, well that’s what I thought the first time I did this. How am I supposed to keep this position? It’s so weird. The truth is, you should feel off, it’s a new way of being in your body. But, you should also be able to relax and feel grounded into your pelvis, legs and feet. Sometimes I like to test my posture by holding a weight (maybe 5-10lbs, not too heavy, no pain, just enough to feel the weight) in my arms before the correction and see where I feel the pressure/effort- usually for me it’s in my hips or back. Then get into my new posture and hold the weight again, the pressure/effort translates straight down into my feet. Check for yourself. This can give you information regarding where all that force is going.
But how does this work in real life, I can’t stay still forever. Well, the more you practice, the easier and more natural it becomes. Let me show you one other example.
First of all, know that your body is already trying to be efficient and keep you upright. It starts out with the best intentions…

But somehow, along the road of life, we end up with dysfunction…
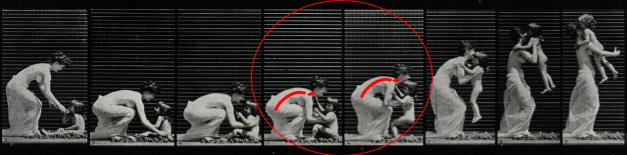
Not perfect photos, but you get the idea. The child has more optimal lifting mechanics than the woman. It’s easiest to see the differences in the middle of the movement, but if you scan to the beginning and end of the reel, you can see that the woman maintains the same curved back and extended head the entire time, while the child stays fairly lined up, head over torso. Almost as if their standing postures impacted their lifting postures, and possibly, if that’s true, other positions as well, like sitting, pushing, pulling, sleeping…woah! Okay, it may seems obvious to you all, but that was a pretty big WOW moment for me. This means that how we stand has direct impact on how we move, how we live our life. So see what shifts in your daily movement over time with this new awareness. You may be surprised.
APPENDIX I
12 Crazy Specific Instructions for your Optimal Posture:
- Stand sideways in the mirror and take a look at yo’ self. First, appreciate what you see, you’re awesome. Second, fully relax. In your normal state, are you more like Juan, Sara or Bruno? I tend to be more of a Sarasite myself (see video)
- Feel the weight in your feet. That’s your first base. Rock side to side slowly, find your center between the right and left. Rock forward and back slowly, find the center over the arch of your foot. No grippy toes, just relaxed, with weight equal between the ball and the heel. That’s your “happy place”.
- Take a big breath in/out. Where does the breath go? Does it expand in all directions? Into your chest, belly, back, ribcage? Now before you hyperventilate, I want you to give yourself a big hug, you deserve it…take a big breath in and arch backward, lifting your chest to the ceiling. Feel how you can lift your rib cage off your pelvis. Feel that space. Are you still on your “happy place” on your feet? Practice this a couple times, then relax.
- Okay, now, bend your knees a little and put your hands on your pelvis. Do a little Carlton dance and swing your pelvis forward and backward. This can be REALLY hard for some of you out there, so give yourself plenty of wiggle room, both physically and mentally. Knees soft, rib relaxed, standing on your “happy place” and swing that pelvis. You can also try some pelvic clocks if you need some help feeling it. I want you to do this until it feels easy and requires little to no effort.
- Are you ready to put it together? To stack up those blocks? Okay, let’s do it! Bend your knees a little if this is your first time, it can help. Find that “happy place” on your feet.
- Give yourself that big hug again and breathe in arching your chest up to the ceiling (like in #3). Then keeping the lift, go UP and OVER to look at your ankles. This should stack your rib cage on top of your pelvis. If at the beginning (#1) you looked in the mirror and your rib cage wasn’t too far back you won’t have to go very far. Or, if you’re at the beginning (#1) you looked in the mirror and your rib cage was too far forward, then you may need to bring it back. Move how you need to stack yourself up. Remember this is your optimal posture, not someone else’s. Do this a couple times to get the feeling. And, by the way, the feeling is really weird. Your body has not been here for a while, you’ll feel off balance, your inner ear-vestibular-balance system is freaking out right now.
- Okay, we’re almost there. You’re standing on your “happy place” of your feet, check. Your rib cage is up and directly above your pelvis. Check. Now you are going to set your pelvis in the correct position in order to receive your rib cage. Slowly relax your tailbone down, kinda like in # 4. You may feel the need to tuck your pelvis, ideally, you wouldn’t do this. Tucking only creates more contraction. You want to ‘let go’ of your low back muscles and allow the pelvis to ‘drop’ into a neutral position. Practice this a couple times.
- Okay, great, you set your base, feet and pelvis. Rib cage is still off loaded and lifted above the pelvis. But now your pelvis is in neutral and ready to receive the goods- those are your organs. Yup,you’ve got organs inside your body and they need to be supported as well. Sometimes they end up spilling out the front of your pelvis. But we want them to nestle into that pelvis- nice and comfy like. Fill up that pelvic bowl. So, do it. Let your organs drop down, relax your breathing and feel how your organs/guts/viscera/belly can fill up the pelvis. Feel the weight of the viscera sink toward your tailbone. Let your butt go.
- Okay, piece de resistance, you’ve got your happy place on your feet, you’ve got your pelvis in neutral, you’ve got your organs in their bowl, now just set your rib cage down on top of your organs, like a little stable-pressure-sandwich. You sometimes need to set the rib cage forward and down, cause sometimes it slides back again. Practice this a couple of times.
- Check the mirror- pelvis should be over feet, abdomen should be RELAXED in pelvis, and rib cage should be relaxed resting over everything below. Everything will feel WEIRD, but you should feel grounded and relaxed from your feet to your rib cage.
- Shoulders- bring your shoulder up, rotate the shoulder and the palms open while they are up, keep them rotated open and then hug them down onto your back. Make sure you don’t lose your rib cage over your pelvis.
- Now, just lengthen the back of your head long, allowing your chin to softly nod and your upper neck muscles to relax.
FAQ
What are pelvic floor muscles?
The pelvic floor muscles are a group of muscles that run from the coccyx to the pubic bone. They are part of the core, helping to support our entire body as well as providing support for the bowel, bladder and uterus. These muscles help us maintain bowel and bladder control and are involved in sexual pleasure and orgasm. The technical name of the pelvic floor muscles is the Levator Ani muscle group. The pudendal nerve, the levator ani nerve, and branches from the S2 – S4 nerve roots innervate the pelvic floor muscles. They are under voluntary and autonomic control, which is a unique feature only they possess compared to other muscle groups.
What is pelvic floor physical and occupational therapy?
Pelvic floor physical and occupational therapy is a specialized area of physical and occupational therapy. Currently, physical and occupational therapistss need advanced post-graduate education to be able to help people with pelvic floor dysfunction because pelvic floor disorders are not yet being taught in standard physical and occupational therapy curricula. The Pelvic Health and Rehabilitation Center provides extensive training for our staff because we recognize the limitations of physical and occupational therapy education in this unique area.
What happens at pelvic floor therapy?
During an evaluation for pelvic floor dysfunction the physical and occupational therapists will take a detailed history. Following the history the physical and occupational therapists will leave the room to allow the patient to change and drape themselves. The physical and occupational therapists will return to the room and using gloved hands will perform an external and internal manual assessment of the pelvic floor and girdle muscles. The physical and occupational therapists will once again leave the room and allow the patient to dress. Following the manual examination there may also be an examination of strength, motor control, and overall biomechanics and neuromuscular control. The physical and occupational therapists will then communicate the findings to the patient and together with their patient they establish an assessment, short term and long term goals and a treatment plan. Typically people with pelvic floor dysfunction are seen one time per week for one hour for varying amounts of time based on the severity and chronicity of the disease. A home exercise program will be established and the physical and occupational therapists will help coordinate other providers on the treatment team. Typically patients are seen for 3 months to a year.
What is pudendal neuralgia and how is it treated?
Pudendal Neuralgia is a clinical diagnosis that means pain in the sensory distribution of the pudendal nerve. The pudendal nerve is a mixed nerve that exits the S2 – S4 sacral nerve roots, we have a right and left pudendal nerve and each side has three main trunks: the dorsal branch, the perineal branch, and the inferior rectal branch. The branches supply sensation to the clitoris/penis, labia/scrotum, perineum, anus, the distal ⅓ of the urethra and rectum, and the vulva and vestibule. The nerve branches also control the pelvic floor muscles. The pudendal nerve follows a tortuous path through the pelvic floor and girdle, leaving it vulnerable to compression and tension injuries at various points along its path.
Pudendal Neuralgia occurs when the nerve is unable to slide, glide and move normally and as a result, people experience pain in some or all of the above-mentioned areas. Pelvic floor physical and occupational therapy plays a crucial role in identifying the mechanical impairments that are affecting the nerve. The physical and occupational therapy treatment plan is designed to restore normal neural function. Patients with pudendal neuralgia require pelvic floor physical and occupational therapy and may also benefit from medical management that includes pharmaceuticals and procedures such as pudendal nerve blocks or botox injections.
What is interstitial cystitis and how is it treated?
Interstitial Cystitis is a clinical diagnosis characterized by irritative bladder symptoms such as urinary urgency, frequency, and hesitancy in the absence of infection. Research has shown the majority of patients who meet the clinical definition have pelvic floor dysfunction and myalgia. Therefore, the American Urologic Association recommends pelvic floor physical and occupational therapy as first-line treatment for Interstitial Cystitis. Patients will benefit from pelvic floor physical and occupational therapy and may also benefit from pharmacologic management or medical procedures such as bladder instillations.
Who is the Pelvic Health and Rehabilitation Team?
The Pelvic Health and Rehabilitation Center was founded by Elizabeth Akincilar and Stephanie Prendergast in 2006, they have been treating people with pelvic floor disorders since 2001. They were trained and mentored by a medical doctor and quickly became experts in treating pelvic floor disorders. They began creating courses and sharing their knowledge around the world. They expanded to 11 locations in the United States and developed a residency style training program for their employees with ongoing weekly mentoring. The physical and occupational therapistss who work at PHRC have undergone more training than the majority of pelvic floor physical and occupational therapistss and as a result offer efficient and high quality care.
How many years of experience do we have?
Stephanie and Liz have 24 years of experience and help each and every team member become an expert in the field through their training and mentoring program.
Why PHRC versus anyone else?
PHRC is unique because of the specific focus on pelvic floor disorders and the leadership at our company. We are constantly lecturing, teaching, and staying ahead of the curve with our connections to medical experts and emerging experts. As a result, we are able to efficiently and effectively help our patients restore their pelvic health.
Do we treat men for pelvic floor therapy?
The Pelvic Health and Rehabilitation Center is unique in that the Cofounders have always treated people of all genders and therefore have trained the team members and staff the same way. Many pelvic floor physical and occupational therapistss focus solely on people with vulvas, this is not the case here.
Do I need pelvic floor therapy forever?
The majority of people with pelvic floor dysfunction will undergo pelvic floor physical and occupational therapy for a set amount of time based on their goals. Every 6 -8 weeks goals will be re-established based on the physical improvements and remaining physical impairments. Most patients will achieve their goals in 3 – 6 months. If there are complicating medical or untreated comorbidities some patients will be in therapy longer.
Comments
Fantastic blog post. Thank you for providing such clear and evidence-based instructions on how and why to teach ourselves new ways of standing. I’ve been struggling as a PT to describe how to adjust the ribcage position, so this hug, breath, and lift technique is lovely. And the idea to compare where you feel the load before and after posture adjustment offers such good feedback on the change in alignment and thus muscle activation. Thank you Brit!
Britt Van Hees says:
“Thanks so much for the positive feedback. I learned the ‘hug, breathe and lift’ technique from Vicky Saliba Johnson. I’m glad it is helpful!”
Love this! thank you for making it so clear.